

How to Spot High Quality DTF Prints
Table of Contents
- What Makes a DTF Print High Quality
- Check the Hand Feel and Texture
- Inspect Color Vibrancy and Accuracy
- Look for Ink Bleeding and Ghosting
- Run a DTF Transfer Wash Test
- Evaluate Flexibility and Elasticity
- Avoid Common DTF Printing Mistakes
- Understanding DTF Curing Temperature Guide
- Frequently Asked Questions
What Makes a DTF Print High Quality
A high quality DTF print is one that survives the wash, flexes with the fabric, and keeps its color after dozens of cycles, not just one. Direct-to-Film transfers look easy from the outside, but the difference between a print that cracks in week two and one that outlasts the shirt itself comes down to production discipline. At Hella Disrespectful Clothing, we run custom DTF printing daily, so we know exactly where most transfers go wrong.

The core tension is simple: a transfer can look perfect in the packaging and fail completely on the garment. Print quality is determined by how the ink, adhesive, and polymer powder interact during the curing process, not by how the design looks on the release film. Most people check the wrong things first. They stare at the design and miss the physical properties that actually predict transfer longevity.
Below, we'll show you exactly how to spot high quality DTF prints using five hands-on checks. You'll learn what to feel for, what to look for under light, and how to run a proper wash test before you waste time pressing a bad batch.
Check the Hand Feel and Texture
The hand feel is the fastest indicator of print quality, and it takes about three seconds to assess. Run your fingers across the printed area. A high quality DTF print should feel smooth with a slight matte finish, almost like the design is part of the fabric rather than sitting on top of it.
A plasticky texture is the first red flag. When a transfer feels thick, rubbery, or glossy, it usually means the adhesive layer was over-applied or the curing process didn't fully bond the layers. This is the same feeling you get on cheap iron-on decals, and it predicts peeling and cracking down the road.
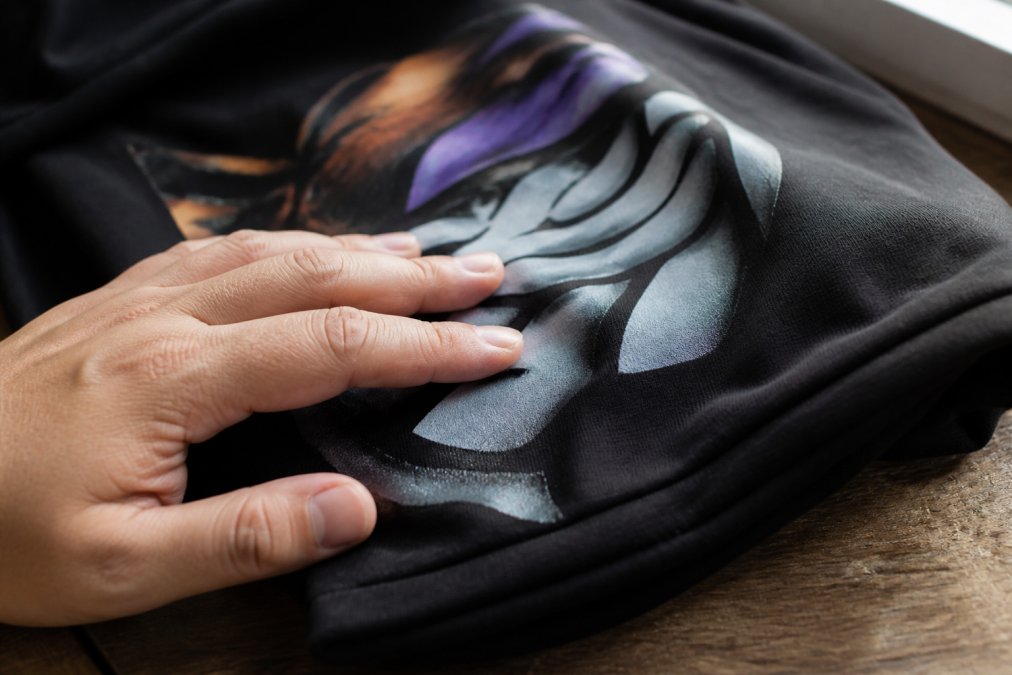
What most guides miss is that the fabric texture should remain visible through the print. Hold the garment up to the light. If you can see the weave of the shirt underneath the transfer, the ink saturation is balanced. If the print looks like a solid plastic sticker, the transfer is too heavy and will fail the flexibility test later.
Inspect Color Vibrancy and Accuracy
Color is where DTF transfers either shine or fall apart, and the failure mode is almost always muddy colors. A high quality DTF print should show crisp, saturated colors that match the original digital design without looking washed out or dull. Whites should be bright white, not gray, and blacks should be deep, not faded.
The culprit behind dull prints is usually incorrect DPI resolution during the printing phase (peer-reviewed research). Transfers produced below the recommended resolution lose fine detail and produce soft, blurry edges that read as low quality from arm's length. When you're inspecting a transfer, look at the fine lines in the design. They should be sharp with no visible pixelation.
Color accuracy also depends on the substrate. Dark garments require a white underbase layer to make colors pop, while light garments don't. A print that looks vibrant on the transfer film but turns muddy after pressing likely had an inadequate white underbase or the wrong curing temperature for that specific fabric type.
Look for Ink Bleeding and Ghosting
Ink bleeding and ghosting are two distinct defects that both signal sloppy production, and you can catch them with a simple visual inspection. Ink bleeding appears as fuzzy edges where the design outline spreads into the surrounding fabric, creating a halo effect. Ghosting shows up as a faint, offset duplicate of the design, usually near the main print.
Bleeding happens when the ink is over-saturated or the transfer is pressed at too high a temperature, forcing the ink to spread beyond its intended boundaries. Ghosting occurs when the transfer film shifts during the heat press process, leaving a shadow image. Both defects indicate the printer skipped quality control steps.
Check the white edges of your design carefully. Clean edges mean the polymer powder and adhesive were applied evenly during the curing process. Ragged or feathered edges usually mean the print head alignment was off or the powder application was inconsistent, and those problems only get worse after washing.
Run a DTF Transfer Wash Test
The wash test is the only reliable way to verify wash durability, and it should be non-negotiable for anyone serious about print quality. However, most wash tests fail because they lack standardization, results vary wildly depending on water temperature, detergent chemistry, and cycle settings. A high quality DTF print must pass a repeatable, documented protocol, not a casual rinse.
Standardized Home Wash Test Protocol
Use this exact methodology to create a baseline you can replicate and compare across different transfers or suppliers:
-
Pre-test preparation: Press the transfer onto a 100% cotton test garment (a white crew-neck tee or similar) using your standard heat press settings. Allow the garment to cool completely for at least 2 hours before washing.
-
Water temperature: Use warm water between 104-113°F (40-45°C) (the FTC). This range mimics typical consumer washing without the extremes of hot water (which accelerates adhesive failure) or cold water (which masks curing defects).
-
Detergent selection: Use a standard, non-enzymatic laundry detergent at the manufacturer's recommended dose. Avoid bleach, fabric softener, and oxygen-based cleaners, as these can artificially degrade the transfer and skew results.
-
Wash cycle: Run a normal or casual cycle (not delicate) for 30-40 minutes. This simulates real-world wear. Do not use extra rinse cycles.
-
Drying: Tumble dry on low heat (130°F / 54°C) for 30-45 minutes. High heat can mask adhesive problems by re-curing weak bonds temporarily.
-
Inspection intervals: Examine the print after cycle 1, cycle 3, and cycle 5. Record observations for each.
| Wash Cycle | What to Check | Pass Criteria | Fail Indicators |
|---|---|---|---|
| After Cycle 1 | Edge adhesion, color bleed into fabric | Edges clean, no color migration | Fuzzy edges, dye transfer to surrounding fabric |
| After Cycle 3 | Cracking in flex areas (shoulders, elbows, chest) | No visible cracks, smooth surface | Hairline cracks, white stress lines |
| After Cycle 5 | Overall fade, adhesion loss, peeling | Color loss <10%, no peeling | Significant fading, corner/edge lifting, flaking |
Why This Matters
A transfer that wasn't cured at the right temperature will start cracking by cycle 2-3, no matter how good it looked fresh out of the press. A transfer with insufficient adhesive will show edge lifting by cycle 1. These defects expose production mistakes instantly and are the primary reason custom print providers lose repeat customers.
Substrate-Specific Adjustments
If you're testing on a fabric other than 100% cotton (polyester blend, performance fabric, or heavyweight), note that wash durability may differ. Polyester blends absorb less water and dry faster, which can mask adhesive problems. Performance fabrics with moisture-wicking treatments may cause premature color fading. Always test on the actual substrate you plan to produce on, and document the results separately so you have a baseline for that material.
What to Do With Test Results
If a transfer passes all five cycles with no cracking, peeling, or significant fading, you can confidently commit to a bulk order or press a full production run. If it fails before cycle 5, reject that batch and contact your supplier. This test is your quality gate, treat it as non-negotiable before you waste time and money on customer orders.
Evaluate Flexibility and Elasticity
A transfer that can't stretch with the fabric will crack, plain and simple. High quality DTF prints should stretch with the garment and return to their original shape without showing any white stress lines, crack resistance failures, or permanent deformation. This is where many transfers fail in real-world wear, especially on fitted garments or performance apparel.
The Stretch Test
Grab the printed area on both sides and pull the fabric taut with moderate force (enough to stretch the garment 2-3 inches, not to the breaking point). Hold for 3-5 seconds, then release. A quality transfer will:
- Flex with the fabric without visible resistance
- Return to its original shape immediately
- Show no white stress lines, hairline cracks, or ink separation
- Feel like part of the shirt, not a rigid overlay
A poor transfer will show one or more of these failure modes:
- White stress lines: Fine white cracks appear in the printed area during stretch. This indicates the adhesive layer is too brittle and cannot elongate with the fabric fibers.
- Ink separation: The ink visibly lifts or cracks away from the adhesive layer, leaving gaps or a web-like pattern. This signals incomplete ink-to-adhesive bonding during curing.
- Permanent deformation: After releasing the stretch, the print remains slightly wrinkled or distorted instead of snapping back. This means the adhesive over-cured and became rigid.
- Peeling at edges: The transfer edge lifts or curls during the stretch test. This indicates insufficient adhesive saturation or poor fabric pre-treatment before pressing.
Why Curing Temperature Controls Elasticity
Elasticity is determined by the curing process, not the transfer design. During curing, the adhesive (typically a polyurethane or acrylic-based compound) melts and bonds to the fabric fibers. The curing temperature and time control how deeply the adhesive penetrates the fabric and how flexible the final bond becomes:
- Under-cured adhesive (too low temperature or too short time): The adhesive doesn't fully melt, leaving pockets of unactivated powder. These gaps create stress points that crack when the fabric stretches. The transfer feels stiff and brittle.
- Properly cured adhesive (correct temperature and time): The adhesive flows evenly, penetrates the fabric weave, and hardens into a flexible matrix that moves with the fibers. The transfer feels like part of the shirt.
- Over-cured adhesive (too high temperature or too long time): The adhesive hardens into a rigid shell that doesn't flex. When the fabric stretches, the adhesive can't keep up, causing cracking or peeling. The transfer feels plastic-like and may show permanent wrinkles.
If you're pressing garments yourself, your heat press time and temperature directly control this outcome. A typical DTF transfer requires 300-330°F (149-165°C) for 10-15 seconds on a standard cotton garment, but this varies by transfer supplier, fabric weight, and heat press model (peer-reviewed research). Always verify your settings with a probe thermometer before starting a production run.
Diagnosing Elasticity Failures
The type of failure you observe during the stretch test tells you which curing stage went wrong:
-
White stress lines during stretch: The transfer film was under-cured in the curing oven before pressing. Contact your supplier or adjust your oven temperature if you're producing in-house.
-
Ink separation or peeling: The garment wasn't pre-pressed (moisture and wrinkles prevent even adhesive bonding), or the heat press pressure was too low. Increase pre-press time to 3-5 seconds and verify your pressure setting.
-
Permanent deformation or rigid feel: Your heat press temperature is too high or the press time is too long. Reduce temperature by 10-15°F and test again.
-
Edge peeling during stretch: The garment fabric is too thin or stretchy for standard DTF settings. Performance fabrics and lightweight knits require lower pressure and slightly lower temperature to prevent adhesive over-saturation.
Substrate-Specific Elasticity Considerations
Elasticity performance varies significantly by fabric type. A transfer that passes the stretch test on 100% cotton heavyweight may fail on a polyester blend or a stretchy performance fabric:
- 100% cotton (standard weight): Baseline elasticity. Most DTF transfers perform well here.
- Polyester blends (50/50 or 65/35): Polyester fibers are more rigid than cotton and don't absorb heat as evenly. Transfers on blends often show reduced elasticity and may require slightly lower press temperature to prevent over-curing.
- Performance fabrics (moisture-wicking, spandex blends): These fabrics stretch significantly and require a softer, more flexible adhesive bond. Standard DTF settings often produce brittle transfers on performance wear. Test extensively before committing to production.
- Lightweight or jersey knits: These fabrics are thin and stretchy. Over-pressure during pressing can crush the fibers and reduce elasticity. Use lower pressure and verify the transfer doesn't feel plasticky.
Always run the stretch test on the actual fabric you plan to produce on. Elasticity is not universal across substrates, and a supplier's quality on cotton doesn't guarantee the same performance on blends or performance fabrics.
Avoid Common DTF Printing Mistakes
Most common DTF printing mistakes happen before the transfer ever touches the garment, and they are entirely preventable. The biggest one is skipping the pre-press. Pre-pressing the garment for a few seconds removes moisture and wrinkles that can cause the adhesive to bond unevenly, leading to peeling later.
Another frequent error is using the wrong pressure on the heat press. Too little pressure leaves the adhesive layer partially bonded, and too much pressure can crush the fabric and cause ghosting. The correct pressure should be firm enough to fully seat the transfer but not so heavy that it distorts the garment's texture.
Substrate-specific quality variations also trip up beginners. The same transfer that performs flawlessly on a 100% cotton heavyweight tee may fail on a polyester blend or a stretchy performance fabric. Different substrates absorb and reflect heat differently, so you must adjust your press time and temperature accordingly. Testing on the actual fabric you plan to use is the only way to confirm compatibility.
Understanding DTF Curing Temperature Guide
A DTF curing temperature guide is essential because the curing process determines whether your adhesive fully bonds to the fabric. Curing happens in two stages: first, the transfer itself is cured in a curing oven to activate the adhesive, and second, the pressed garment may need additional heat to fully set the bond.
The transfer film curing stage typically requires a lower temperature to melt the polymer powder without scorching the ink. The press stage then uses higher heat and pressure to fuse the adhesive to the garment fibers. Getting these temperatures wrong at either stage produces the defects we've covered: cracking, peeling, and poor wash durability.
For anyone ordering custom DTF gang sheets or single prints rather than producing them in-house, the curing quality is already baked in by the provider. This is why choosing a supplier with consistent quality control matters more than the price per sheet. At Hella Disrespectful Clothing, our DTF lab produces vibrant, high-quality transfers with fast turnaround and no minimums, so you can test a single print before committing to a full run. Start with a single DTF print to check the hand feel and wash durability on your own fabric, then scale up to custom DTF gang sheets once you've confirmed the quality meets your standard.

The difference between a print that looks cheap and one that speaks for itself comes down to these checks. Run your fingers across the surface, inspect the edges under light, stretch the fabric, and wash it three times. A high quality DTF print passes every test, and it does so because the production process was disciplined from the first layer of ink to the final cure. That's the standard we hold at Hella Disrespectful Clothing, and it's the standard you should demand from any provider.
Frequently Asked Questions
What does a high-quality DTF print feel like?
A high-quality DTF print should feel soft and flexible on fabric, moving naturally with the garment. The transfer shouldn't feel plasticky or stiff. Run your fingers across the design, premium prints have a smooth cured adhesive layer that doesn't crack when you bend the fabric. Poor-quality prints feel thick, rigid, and may peel at the edges after minimal wear.
How can you tell if a DTF transfer is cured correctly?
Properly cured DTF transfers pass the flex test: fold the fabric gently and the print stays intact without cracking. Check the adhesive layer, it should be hard and uniform, not tacky or soft. Visual inspection reveals even color saturation and no white edges around the design. If the print feels rubbery or leaves residue on your fingers, the curing temperature was too low or the curing time was insufficient.
Do high-quality DTF prints crack after washing?
No. High-quality DTF prints maintain their integrity through multiple wash cycles when properly cured and applied. Run a wash durability test: wash the garment in warm water with similar colors, then check for cracking, peeling, or color fading. If prints crack, peel, or fade significantly after just a few washes, the curing process, ink saturation, or substrate compatibility was compromised.
What are the signs of a low-quality DTF transfer?
Low-quality DTF transfers show muddy colors, dull prints, white edges around the design, and ink bleeding into surrounding fabric. The hand feel is often plasticky and stiff. Visual inspection may reveal uneven ink saturation, poor design outline clarity, or ghosting where the image appears faint or washed out. These defects indicate issues with print head alignment, DPI resolution, polymer powder application, or inadequate curing temperature during the manufacturing process.
Getting quality right means trusting a provider who treats the curing process as seriously as the design. Hella Disrespectful Clothing delivers custom DTF prints that press clean, flex with your fabric, and survive the wash, backed by vibrant color and clean edges on every sheet. Whether you're building a brand or running a single drop, our DTF lab handles it with no minimums and fast turnaround. Get started with Hella Disrespectful Clothing and press prints that hold up.