

Why Custom Apparel Prints Crack (And How to Fix It)
Table of Contents
- Why Custom Apparel Prints Crack: The Main Causes
- How Heat and Curing Temperature Break Down Ink
- Fabric Stretch and Friction: Why Prints Crack on Flexible Garments
- How to Wash DTF Shirts Without Cracking the Print
- Best DTG vs DTF Printing for Crack Resistance
- How to Fix Cracked Prints and Restore Your Shirts
- Prevention Starts at the Print Shop
- Conclusion
- Frequently Asked Questions
Last Updated: September 9, 2026
Custom apparel prints crack for a handful of predictable reasons, and almost all of them trace back to curing, fabric movement, or how the shirt is washed. If you have ever pulled a graphic tee from the dryer to find spiderwebs of lines running through the chest art, you know the frustration. Below, we explain exactly why custom apparel prints crack and how to stop it.
Why Custom Apparel Prints Crack: The Main Causes
Print cracking is a mechanical failure of the ink layer, not a random quality issue. When the design loses flexibility, any force applied to the fabric transfers directly to the print, causing it to fracture and separate.
The root causes fall into three categories: improper curing, excessive fabric stretch, and harsh garment care. Most of the time, a cracked print is the result of the ink being either over-cured or under-cured. Over-cured ink becomes brittle and snaps under stress; under-cured ink never fully bonds to the fibers, so it lifts and flakes away. Both outcomes look similar but require different fixes.
How Heat and Curing Temperature Break Down Ink
Curing temperature is the single most important variable in print durability, but the failure mode depends entirely on the ink chemistry. Plastisol, water-based, discharge, and DTF adhesive each have a distinct polymerization curve, and missing that window produces different types of cracks.
Plastisol and over-curing. Plastisol ink is a suspension of PVC resin particles in a plasticizer. When heated to the correct range, typically 320°F to 330°F for 30 to 60 seconds depending on the garment, the resin absorbs the plasticizer and fuses into a continuous film (the FDA). Push the temperature past 350°F and the plasticizer begins to volatilize and the PVC resin starts to thermally degrade (PubMed). The film loses its plasticizer content, which is exactly what gives it flexibility, and the print becomes hard, glossy, and prone to cracking along sharp angles. This is the classic "over-cured" crack pattern: fine, spiderweb-like lines that appear after just a few wears, even without washing.
Under-curing and delamination. The opposite failure occurs when the ink never reaches full fusion. At temperatures below roughly 300°F, the resin particles only partially absorb the plasticizer. The print feels slightly tacky or rubbery, and the bond to the fabric fibers is incomplete. Under-cured prints do not crack in the same way; they lift and flake off in chunks, often starting at the edges of the design. This is a delamination failure, not a fracture failure, and it is far more common in home-pressed garments where the user relies on a handheld iron that never reaches a consistent platen temperature.
Water-based and discharge inks behave differently. Unlike plastisol, water-based inks soak into the fabric and bond with the fibers themselves. They do not sit on the surface as a thick film, so they are inherently more crack-resistant. However, they are also more sensitive to heat. Over-curing a water-based print at temperatures above 340°F can scorch the binder and cause the print to become chalky and brittle, cracking along the fabric weave rather than in a random pattern (peer-reviewed research). Discharge ink, which removes the garment's dye and replaces it with pigment, is even more delicate. It requires a precise cure window around 320°F; too low and the discharge agent never activates, too high and the fabric itself weakens, causing the print to crack as the underlying fibers break down.
DTF adhesive powder has its own window. Direct-to-film transfers use a hot-melt adhesive powder that must reach its full melt temperature, typically 280°F to 300°F at the platen, to flow into the fabric and create a mechanical bond. If the press temperature is too low, the adhesive remains granular and the transfer peels off in sheets. If it is too high, the adhesive becomes overly fluid and wicks through the fabric, reducing the bond strength and leaving the ink layer exposed and brittle.
The practical takeaway is that "cracking" is not one problem but at least four different failure modes, over-cured brittleness, under-cured delamination, water-based binder scorch, and adhesive melt failure, each requiring a different fix. When you order custom apparel, ask the printer which ink system they use and what temperature they cure at. A shop that cannot answer with a specific number and a verification method is likely guessing.
Fabric Stretch and Friction: Why Prints Crack on Flexible Garments
Fabric stretch is the enemy of any printed design, and it explains why cracks appear first at the creases and seams. When you pull a shirt over your head or stretch the fabric across your chest, the fibers move. A properly cured print moves with them. A brittle one does not.
The crack pattern usually follows the direction of the stretch. Horizontal lines across a chest design indicate vertical stretching of the fabric, which happens when you pull the shirt down or when the garment is tugged during wear. Mechanical stress from friction, like a seatbelt rubbing against a print or a backpack strap sitting on your shoulder, creates localized wear that accelerates cracking and fading.
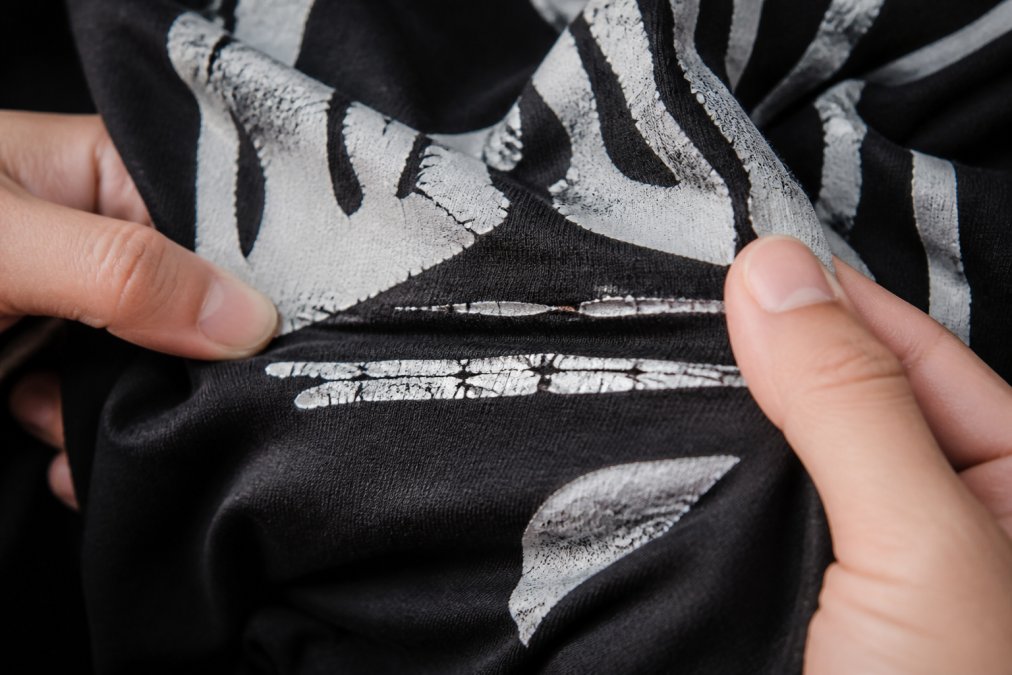
Synthetic fibers complicate things further. Polyester and performance blends do not absorb ink the way cotton does, so the print sits more on the surface, making it more exposed to friction and more likely to crack under repeated flexing. Cotton and cotton-heavy blends give the ink room to grip the fibers, which is why heavyweight cotton tees hold prints longer.
How to Wash DTF Shirts Without Cracking the Print
Washing and drying habits determine whether a quality print lasts one year or five. The wash cycle itself is not the main culprit, the dryer is. High heat in a tumble dryer re-softens the adhesive layer and degrades it faster with every cycle.
Follow these steps to protect your DTF prints:
- Turn the shirt inside out before washing. This protects the print from friction against other garments.
- Use cold water on a gentle cycle. Hot water softens the ink and weakens the bond.
- Skip the dryer. Hang the shirt to dry, or use the lowest heat setting if you must machine dry.
- Use a mild detergent. Bleach and fabric softeners break down the ink layer over time.
- Wash with like colors and avoid overloading the machine, which increases friction.
Best DTG vs DTF Printing for Crack Resistance
Direct to Film (DTF) printing generally offers better crack resistance than Direct to Garment (DTG) for most streetwear applications. DTF transfers use a hot-melt adhesive powder that fuses the design directly into the fabric fibers, creating a bond that flexes with the garment rather than sitting on top of it.
| Printing Method | Ink Layer | Crack Resistance | Best For |
|---|---|---|---|
| DTF | Adhesive-backed film | High | Dark fabrics, frequent washing, bold designs |
| DTG | Absorbed into fibers | Medium | Light garments, soft-hand feel, small batches |
The tradeoff is feel. DTG prints are softer because the ink soaks into the fabric, while DTF prints have a slight texture you can feel. For graphic tees that get washed weekly, DTF wins; for a subtle, no-feel print on a light shirt, DTG is the better choice. Many shops use both methods depending on the job.
How to Fix Cracked Prints and Restore Your Shirts
Once a print cracks, it will not heal on its own, but the fix depends entirely on the type of failure. Before you reach for an iron, diagnose the damage, the wrong repair can make it worse.
Diagnose the crack pattern first. Hold the shirt under bright light and examine the lines. Fine, hairline spiderwebs that follow the contour of the design indicate over-curing, the ink has become brittle and is fracturing under normal flex. These are the most repairable. Larger chunks missing at the edges, with the ink lifting away from the fabric, indicate under-curing or adhesive failure, the bond to the fibers never fully formed. These require re-bonding, not just smoothing. If the print shows a chalky, dusty surface with cracks that follow the weave of the fabric, the binder has degraded from excessive heat, and no repair will restore it.
For hairline cracks from over-curing:
- Turn the shirt inside out and place a clean cotton cloth over the back of the print area.
- Set your iron to medium heat (around 300°F, no steam) and press for 10 seconds on the back side. This gently re-softens the ink without direct contact.
- Flip the shirt right side out, place a sheet of parchment paper over the design, and press for 5 seconds at medium heat. Do not use a back-and-forth motion, press straight down and lift.
- Allow the shirt to cool completely flat. Do not move or fold it for at least 10 minutes.
This process can partially re-fuse the fractured ink layer and make hairline cracks less visible. It will not restore the original flexibility, the plasticizer loss is permanent, but it can extend the print's life by several more washes.
For edge peeling from under-curing or adhesive failure:
- Apply a thin layer of heat-activated adhesive film (available at most craft stores as fusible web) over the lifted edges.
- Cover with parchment paper and press at 320°F for 10 seconds.
- The adhesive will melt and re-bond the lifted sections to the fabric.
This works best on DTF transfers where the adhesive layer is the point of failure. For plastisol prints that are peeling, the ink never bonded to the fibers, and re-pressing will not create a bond that did not form during the original cure.
When replacement is the honest answer. If the cracking covers more than 30% of the design, if chunks of ink are missing entirely, or if the print has a chalky texture, the structural integrity of the ink layer is gone. No amount of re-pressing will restore it. At that point, the cost-effective fix is to reorder the print. When you do, ask the printer three specific questions: What ink system do you use? What temperature do you cure at? Do you run wash tests on samples? A printer who answers with specific numbers and a documented testing process will not send you a print that cracks in a month.
A note on restoration products. Some garment-care brands sell "print restorer" sprays or solutions. Most are silicone-based fabric softeners that temporarily reduce friction and make cracks less visible by filling them with a glossy residue. They do not repair the ink bond, and they can actually accelerate future cracking by softening the surrounding fabric and increasing stretch. Save your money and use the heat-press method above instead.
Prevention Starts at the Print Shop
The best way to fix cracked prints is to never get them in the first place. Prevention starts with the printer, not the washing machine. A shop that controls curing temperature, uses quality ink, and tests its prints on actual garments will produce designs that survive years of wear.
When you order custom apparel, ask the printer how they verify curing temperature and whether they run wash tests on their samples. A reputable shop will have answers; one that hesitates is probably guessing.
At Hella Disrespectful Clothing, our custom DTF printing process is built around consistent heat application and quality control. Whether you need a single DTF print for a one-off design or a full gang sheet for a drop, the goal is the same: bold, clean transfers that hold up to real life. Our prints start at $2.00 for single designs and $14.00 for gang sheets, with no minimums and fast turnaround.

Conclusion
Cracked prints are not inevitable, and they are not always the shirt's fault. Curing temperature, fabric stretch, and wash habits all play a role in how long a design lasts. Understanding why custom apparel prints crack lets you make smarter choices when you buy and when you care for your gear.
The fix is simple: buy from printers who control their process, wash cold, and air dry. That combination keeps your prints looking sharp through dozens of wears. Ready to get a print that actually lasts? Shop the drops at Hella Disrespectful Clothing and see the difference quality control makes.
Frequently Asked Questions
How to prevent shirt print from cracking off?
Wash inside out in cold water, skip the dryer, and avoid fabric softener. Heat and agitation break down the ink bond. Hang dry or use low heat tumble dry. For DTF prints, wait 72 hours after pressing before the first wash so the adhesive fully cures. Stretching the fabric while the print is wet also causes cracking, so handle the shirt gently when transferring it from the washer.
How to fix cracked print on clothing?
Light surface cracks can be repaired with a heat press. Place parchment paper over the cracked area and press at 300°F for 10 seconds to reflow the ink. Heavier peeling or flaking needs a patch: apply a new DTF transfer over the damaged area. If the ink is lifting in large sections, the adhesive bond is gone and the print cannot be saved.
Do DTG prints crack?
Yes, DTG prints crack, but they behave differently than screen printed or DTF prints. DTG ink soaks into the fabric fibers rather than sitting on top, so it fades and wears away gradually instead of cracking in large flakes. Cracking happens when the print is over-cured or applied to a tight weave fabric that cannot absorb the ink fully.
Is it normal for custom apparel prints to crack over time?
Some cracking after years of wear is normal, but cracking within the first few months signals a problem. Improper curing temperature, low quality plastisol ink, or washing in hot water accelerates breakdown.